Learning individual cursive letters is the first step, but connecting those letters is where cursive writing starts to feel natural. To connect cursive letters, use the exit stroke of one letter to lead into the starting stroke of the next letter. Beginners should start with simple two-letter combinations, then move into short words and sentences.
You do not need to memorize hundreds of different connections. Most joins follow a few basic movement patterns. Once you understand where a letter finishes and where the next letter begins, connecting letters becomes much easier.
Table of Contents
What Does It Mean to Connect Cursive Letters?
A cursive connection is the stroke that carries your pencil from one letter into the next letter within a word. Instead of finishing one letter and starting the next separately, the strokes flow together.
For example, look at the word “in.” The cursive i finishes with a stroke that moves toward the n. That ending movement becomes the starting movement for the next letter.
The same idea appears in words such as:
- an
- in
- on
- at
- it
- sun
- hand
Every cursive letter has its own shape, but the connection between letters helps those shapes work together as a word.
If you are still learning individual letters, start with the cursive alphabet and practice the lowercase forms before moving into longer connections.
Entry and Exit Strokes
Two simple terms will help you understand cursive joins:
- Entry stroke: The movement that begins a letter.
- Exit stroke: The movement that finishes a letter and can lead into the next one.
Think of the exit stroke as a small bridge. It takes your pencil from the first letter toward the next one without making the word look like a collection of separate letters.
The exact connection can vary between cursive styles, so follow the letter forms used in the handwriting system you are learning. Different cursive systems do not always connect every letter in the same way.
How Cursive Letter Connections Work
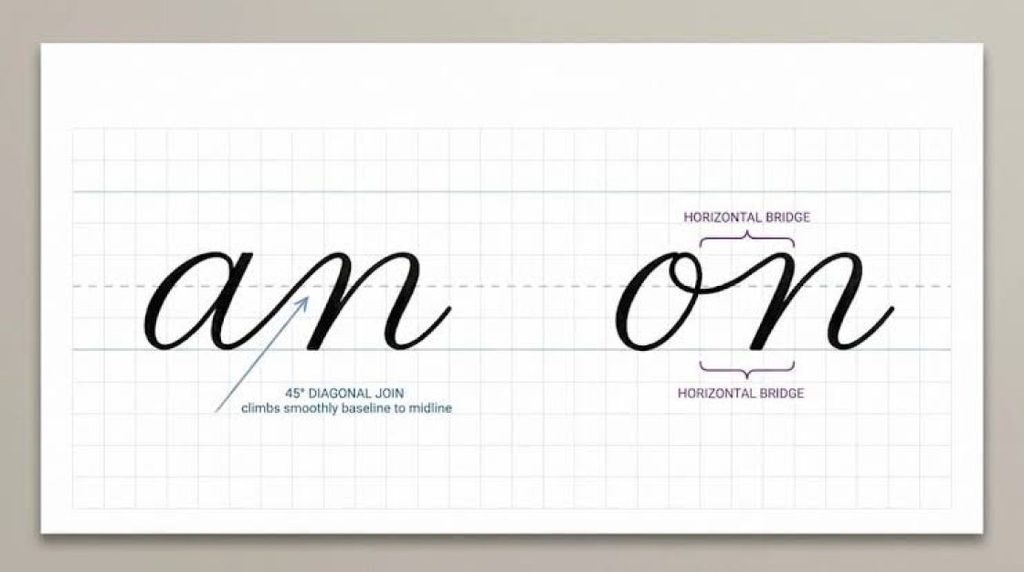
The easiest way to understand cursive joins is to look at where the first letter finishes.
Some letters finish near the baseline and move upward into the next letter. Others finish higher and create a more level connection.
You do not need to learn complicated terminology to practice these movements. Focus on three things:
- Where the first letter ends
- Where the next letter starts
- How smoothly the connecting stroke travels between them
Start With the First Letter
Write the first letter carefully instead of rushing into the connection.
For example, when practicing a + n, first make a clear cursive a. Pay attention to its final stroke. That stroke should naturally lead toward the n.
A weak or incomplete exit stroke can make the next letter feel disconnected.
Carry the Stroke Into the Next Letter
Once the first letter is finished, continue the movement toward the next letter.
Try:
a → an → and
The goal is not to make the letters run together into one messy shape. Each letter should remain recognizable while the connection between them feels smooth.
Keep the Letters at a Consistent Height
Letter height also affects how a connection looks.
Short letters such as a, e, i, n, o, u generally stay within the main writing area. Taller letters such as b, h, k, l, and t extend higher.
If one letter is much larger or smaller than the next, the join can look uneven even when the stroke itself is correct.
Finish the Word Naturally
The final letter in a word does not need the same exit movement as a letter that will connect to another letter.
Compare:
an
with:
and
In an, the word ends after the n. In and, the n needs to continue into the d.
Thinking about the whole word helps you understand why the same letter can look slightly different at the end of a word.
How to Connect Cursive Letters Step by Step
A simple practice sequence can take you from individual letters to complete words.
1. Choose Two Letters
Start with an easy pair such as:
a + n
Do not begin with a long word. Two letters give you enough space to focus on the connection.
2. Write the First Letter
Form the first letter using the correct stroke direction and size.
For a, keep the oval shape clear and finish with its connecting stroke.
3. Follow the Exit Stroke
Do not stop as soon as the first letter looks complete. Follow its final movement toward the next letter.
4. Begin the Second Letter
Let the connection guide your pencil into the next letter.
Try:
an an an an
Keep the size and spacing similar each time.
5. Move Into a Short Word
Once the pair feels comfortable, use it inside a word:
an → and
Then try:
hand
The connection now becomes part of real handwriting rather than an isolated drill.
6. Add More Letters
Move from two-letter combinations to three- and four-letter words.
For example:
in → ink → think
This gradual progression gives your hand time to become familiar with each movement.
Start With These Easy Cursive Letter Combinations
Two-letter combinations are one of the easiest ways to practice cursive connections because you can focus on one movement at a time.
Try these pairs:
an | in | on | at | it | am | en | un
Write each pair slowly several times.
Then place the same connection inside a word:
| Letter Pair | Word Example |
| an | hand |
| in | find |
| on | money |
| at | cat |
| it | sit |
| am | lamp |
| en | send |
| un | sunny |
The goal is not to fill a page as quickly as possible. Focus on making the same connection consistently.
Once you are comfortable with individual letters, you can also practice specific forms such as cursive C or cursive B and then use their exit strokes inside words.
Difficult Cursive Letter Connections and How to Practice Them
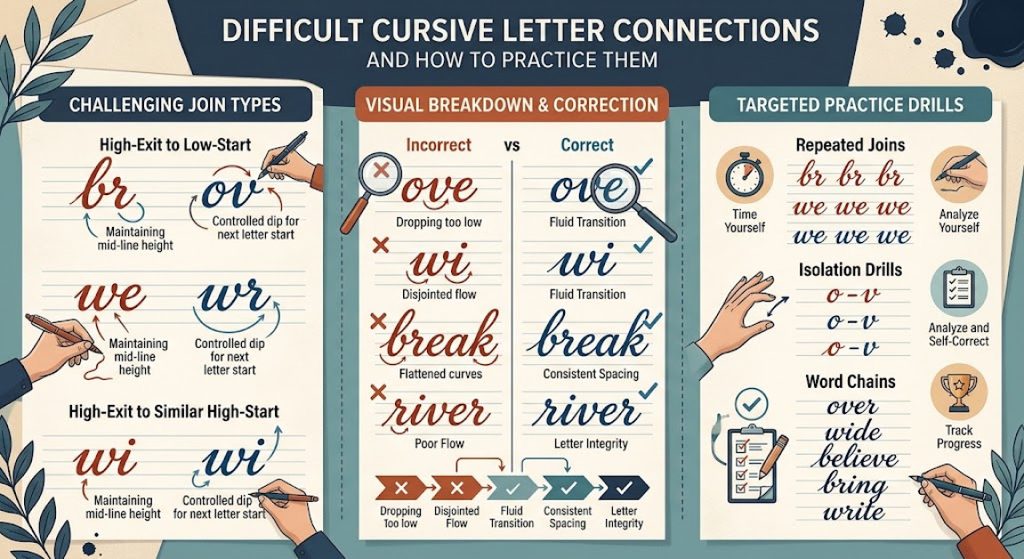
Some letter combinations require more control than others. A connection may change direction, rise higher, enter a rounded letter, or follow a letter that finishes at a different height.
Here are a few combinations worth extra practice.
R + E
The r can be tricky because its ending movement is different from simpler baseline letters.
Practice:
re → red → green
Start slowly and keep the r recognizable before worrying about speed.
V + E
The connection after v can feel unusual because the letter finishes higher than many basic lowercase letters.
Practice:
ve → very → seven
Focus on moving naturally from the end of the v into the e instead of dropping your pencil back to the baseline.
W + R
This combination changes direction quickly.
Practice:
wr → write → wrong
Do not squeeze the two letters together. Give each letter enough space to remain readable.
S + T
The shape of cursive s can change when it appears inside a word.
Practice:
st → stop → fast
Write the pair several times before using it in a longer word.
G + R
The lowercase g includes a descender, so the connection can feel more complicated.
Practice:
gr → green → great
First get comfortable writing the g correctly. Then work on bringing its ending stroke back into the next letter.
If a particular letter is still difficult on its own, practice its individual form before trying to connect it. For example, the cursive G guide can help you work on the letter before using it in words.
Common Mistakes When Connecting Cursive Letters
Good connections are easier to build when you know what to watch for.
Stopping Between Every Letter
If you completely stop after every letter, your writing can start to look like separate printed letters.
Practice short pairs without unnecessary pauses.
an → an → an
Keep the movement controlled rather than trying to write quickly.
Forcing Every Letter Together
Cursive does not mean that you must keep your pencil on the paper at all times.
Some cursive styles use a pen lift for certain letters or combinations. Capital letters can also follow different connection rules. Follow the style you are learning instead of forcing an awkward connection.
Making the Join Too High
A connection that rises too far can change the shape of the next letter.
Check the height of the join and compare it with the model you are following.
Making the Join Too Low
Dropping a connection to the baseline when the next letter needs a higher entry point can distort the word.
Practice the pair slowly and watch where the first letter actually finishes.
Changing Letter Size
A good connection cannot fix inconsistent letter size.
If your a is tiny and your n is much larger, the word may look uneven even if the connection is smooth.
Writing Too Fast
Speed should come after control.
Write slowly enough to see where each letter starts and finishes. Once the movement becomes familiar, your natural writing speed can increase.
Forgetting Word Spacing
Letters should connect inside a word, but separate words still need clear spaces.
Compare:
my cat is happy
with writing that removes the spaces between the words.
Readable cursive needs both good letter connections and good word spacing.
Do All Cursive Letters Have to Connect?
No. Not every cursive letter must connect in every handwriting style.
Different cursive systems use different joining rules. Some letters may require a pen lift, and uppercase letters often follow different connection patterns from lowercase letters.
The goal is readable and comfortable cursive, not keeping your pencil on the page for an entire sentence.
For example, forcing a connection that changes the shape of a letter can make the word harder to read. A short, intentional pen lift can sometimes produce a cleaner result.
Follow the examples from the specific cursive style you are learning and stay consistent.
Practice Cursive Connections From Letters to Words
The best way to build confidence is to increase the difficulty gradually.
Stage 1: Individual Letters
Start with lowercase letters and make sure their shapes and exit strokes feel comfortable.
For example:
a a a a
n n n n
i i i i
Stage 2: Two-Letter Joins
Now combine the letters:
an an an
in in in
ni ni ni
Stage 3: Short Words
Turn those joins into useful words:
cat
hand
rain
sun
find
Stage 4: Longer Words
Add words that contain more than one type of connection:
little
morning
sunshine
writing
Stage 5: Short Sentences
Finally, use the connections in real writing:
I can write.
The sun is bright.
I like my new book.
At this stage, focus on the complete sentence. Check letter size, connections, word spacing, and readability instead of correcting every single stroke.
For more word-level practice, use the site’s cursive words resources.
A Simple 10-Minute Cursive Joining Practice Routine
You do not need a long handwriting session to practice connections. A short routine can keep the focus clear.
2 minutes: Warm-up strokes
Practice simple curves, undercurves, and connecting movements.
2 minutes: One difficult letter
Choose one letter that causes trouble and write it slowly.
2 minutes: Two-letter connections
Practice one or two pairs such as:
an, in, re, ve
2 minutes: Short words
Use those connections in words such as:
hand, find, very, green
2 minutes: One or two sentences
Finish with a short sentence and check your overall handwriting.
If a connection still feels awkward, keep practicing that specific pair instead of adding several new ones at once.
Tips for Helping Kids Connect Cursive Letters
Children usually learn to connect cursive letters more easily when the practice feels manageable.
Start small. Two-letter combinations are easier to understand than long words.
Use familiar words. A child’s name, pet’s name, favourite food, or favourite toy can make practice more meaningful.
Model the movement. Show the child where the first letter ends and how that stroke moves into the next letter.
Correct one thing at a time. If the letters are too large and the spacing is uneven, focus on one issue first.
Let practice stay short. A focused 10-minute session can be easier to manage than a long handwriting lesson.
Move from tracing to independent writing. Tracing can help children understand the movement, but independent practice helps them control the strokes themselves.
Frequently Asked Questions
How do you connect cursive letters?
Connect cursive letters by using the exit stroke of the first letter to lead into the entry stroke of the next letter. Start with simple two-letter combinations before practicing complete words.
What is the easiest way to learn cursive connections?
Start with short pairs such as “an,” “in,” “on,” “at,” and “it.” Repeat each pair slowly, then use the same connection in familiar words.
Why do my cursive letters look disconnected?
Your letters may look disconnected if you stop between letters, use inconsistent exit strokes, or change the height and spacing of your letters. Practice one connection slowly until the movement feels natural.
Do you have to connect every cursive letter?
No. Joining rules vary between cursive styles, and some letters or combinations may use a pen lift. Follow the model for the handwriting style you are learning.
How can kids practice cursive connections?
Kids can practice individual letters, two-letter combinations, short words, and simple sentences in that order. Short, regular practice helps them build control without making handwriting feel overwhelming.
What should you practice first in cursive?
Practice individual lowercase letters first, especially their entry and exit strokes. Then move to simple two-letter joins, short words, and sentences.
Final Thoughts
Connecting cursive letters becomes much easier when you stop treating every word as a new challenge. Most connections use familiar movements that can be practiced in small steps.
Start with individual letters, move to two-letter joins, then build those joins into words and sentences. Give extra attention to difficult combinations such as re, ve, st, wr, and gr, but keep the practice simple.
Good cursive does not need to be perfectly uniform. It needs to be clear, comfortable, and easy to read. Slow practice gives you control first. Once the connections become familiar, smoother and faster writing follows naturally.